Keep Your Mini-Split Running Efficiently Year After Year
A mini-split system that’s been running flawlessly for five years doesn’t stay that way by accident. It stays efficient because someone cleaned the outdoor coil last spring, checked refrigerant pressures before cooling season, and replaced filters before they clogged. Neglect any of those steps, and efficiency drops 10–15% annually—and the system starts failing.
J&G Heating & Air Conditioning maintains mini-splits across Lancaster County with annual tune-ups that catch problems early. Our technicians clean coils, verify refrigerant charge, test electrical components, and confirm that every part of your system is operating within manufacturer specifications. The result: your system runs quieter, cools and heats faster, uses less electricity, and lasts 15+ years instead of 8–10.
Annual tune-ups cost far less than emergency repairs and extend system life dramatically. We recommend spring service before cooling season and fall service before heating season. Book your appointment now—we’ll clean, test, and optimize your system so it runs at peak efficiency all year.
A micro-leak in a copper joint or fitting loses refrigerant slowly—you might not notice until cooling capacity drops. By then, the compressor has been overheating for weeks. Our annual tune-ups include pressure tests and dye-tracer inspections that find leaks at pinhole stage, when repairs are straightforward instead of facing an expensive compressor replacement. Early detection saves significantly.
Dirt, pollen, and debris accumulate on the outdoor coil throughout the year, forcing the system to work harder to release heat. This reduces cooling capacity and increases electrical consumption. We clean the coil with proper low-pressure water spray and soft brushes, restoring heat transfer efficiency to manufacturer specifications. Many customers see 15–20% lower summer bills after their first professional cleaning.
A system overcharged by just a few ounces runs hotter and uses more energy; undercharged, it can’t reach setpoint temperature. Both conditions reduce compressor lifespan. We connect manifold gauges to your system and measure high-side and low-side pressures under operating load. We calculate superheat and subcooling to determine if charge is spot-on or if adjustment is needed. Precision charge extends compressor life by years.
Vibration, thermal cycling, and corrosion loosen electrical connections over time. A loose connection heats up and wastes energy; continued arcing can cause compressor failure or electrical fire. We visually inspect all power terminals, use a multimeter to verify voltage and continuity, test the capacitor (a common failure point), and tighten any loose connections. Safety and reliability go hand in hand.
High-pressure switches, low-pressure switches, and thermal overload devices protect your compressor from dangerous fault conditions. We test these safety systems annually so you know they’ll actually work if something goes wrong. A safety control that fails silently during the year won’t help during an actual emergency—we catch and fix those before they’re needed.
Manufacturers require documented regular maintenance to honor warranty claims. When you document annual tune-ups with us, you create a record proving your system has been properly maintained. If a part fails later, warranty claims are processed smoothly because we can prove the failure wasn’t caused by neglect. Skipped maintenance voids some warranty coverage.
Our Service Areas
Mini-Split Maintenance Service Areas in Pennsylvania
We schedule annual tune-ups and seasonal maintenance across Lancaster County to keep your system running efficiently:
Communities We Serve:
Our headquarters with flexible scheduling and rapid service availability for all mini-split maintenance needs. More about Lancaster service →
10 minutes away; convenient scheduling and same-technician continuity for your mini-split system care. More about Denver service →
Serving families with expert preventive maintenance and efficiency optimization for all mini-split brands. More about Ephrata service →
Full maintenance capabilities for all mini-split brands and models with comprehensive service records. More about Columbia service →
Local maintenance experts with proven track record in system care and efficiency optimization. More about Lititz service →
Our Process
Our Comprehensive Mini-Split Maintenance Visit
Every mini-split maintenance visit we perform follows the same proven process — designed to catch problems early, restore peak efficiency, and extend system life. Tap any step below to see exactly what happens.
We arrive with your previous service records if available, or we create a new baseline documenting your system’s current condition. We ask when the last professional service occurred, whether you’ve noticed any changes in efficiency or comfort, and what specific concerns you have. We then inspect both indoor and outdoor units visually: checking for corrosion, visible damage, water leaks, or unusual wear. We note the system’s model, refrigerant type, and installation year so we understand the maintenance history and age.
Review service history and document current system age and baseline performance
Ask about efficiency changes, comfort concerns, or unusual sounds or smells
Visually inspect outdoor condenser for dirt, corrosion, loose components, damaged fins
Visually inspect indoor head unit for water leaks, dust accumulation, drain blockages
Check that electrical disconnect switch and circuit breaker are accessible and properly labeled
Note refrigerant type and quantity per the nameplate
The outdoor condenser coil is the system’s heat exchanger—it’s where the system releases the heat it’s extracted from inside your home. Over a season of operation, dust, pollen, leaves, and environmental debris coat the aluminum fins, reducing heat transfer and forcing the compressor to work harder. We gently clean the coil with low-pressure water spray (high pressure damages the delicate fins) and a soft brush, working systematically to remove all buildup without bending fins.
For stubborn debris, we use approved coil cleaners applied carefully per manufacturer guidelines. Once clean, we verify that airflow around the condenser unit is unrestricted—no grass, shrubs, or debris blocking the intake or discharge vents. We also inspect the coil fins for physical damage (bent or broken fins reduce efficiency) and repair minor bends carefully using fin combs if needed.
Remove leaves, dirt, and debris from around the outdoor condenser unit
Spray outdoor coil gently with low-pressure water to remove surface dust and pollen
Apply approved coil cleaner if buildup is heavy, then rinse thoroughly
Use soft brush or fin comb for careful cleaning without damaging delicate aluminum fins
Verify airflow is completely unrestricted around the unit’s intake and discharge vents
Inspect for bent or broken fins and repair carefully if damage is found
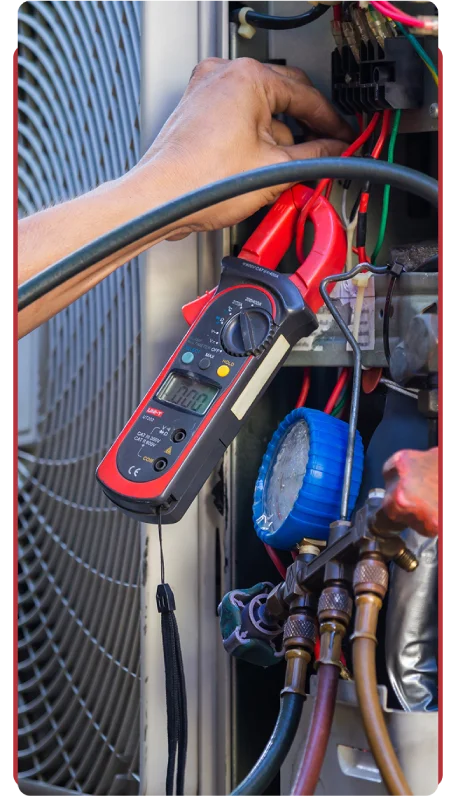
The capacitor is one of the most common mini-split failures—it stores electrical charge that helps the compressor start and run smoothly. A failed capacitor leaves the system unable to start. We test the capacitor with a dedicated capacitor meter to verify it still holds proper charge. We also test the contactor (an electrical switch that engages the compressor) for proper operation, and check the thermal overload switch (which trips if the compressor overheats) to confirm it’s functioning as designed.
We then use a multimeter to verify electrical continuity and voltage at key connection points: the power terminals (should read 240V +/- 10%), the control circuit connections, and ground continuity to the electrical panel. We tighten any loose connections found, as vibration can loosen terminals over months of operation. A loose power connection generates heat and wasted energy—this simple step often yields surprising efficiency gains.
Test capacitor with a dedicated meter to verify it holds proper electrical charge
Test contactor to confirm it engages and disengages smoothly
Test thermal overload switch to confirm it trips at proper temperature if needed
Measure voltage at power terminals (expect 240V ±10%)
Test continuity of the control circuit from thermostat to compressor
Verify proper electrical grounding to the main electrical panel
Tighten any loose connection terminals found during inspection
We connect a manifold gauge to the refrigerant service ports on the outdoor unit (a skill that requires EPA certification and proper training to do safely). With the system running in cooling mode, we record the high-side pressure (compressed refrigerant leaving the compressor) and low-side pressure (returning refrigerant entering the compressor). These pressures tell us immediately if charge is correct, too low (indicating a leak), or too high (indicating overcharge).
We then calculate superheat (the temperature of the low-side line above saturation point) and subcooling (the temperature of the high-side line below saturation point). These values determine whether the charge is spot-on or requires adjustment. We compare against manufacturer performance curves specific to your system’s tonnage and local ambient temperature. If charge is off by even a few ounces, we adjust it precisely using calibrated scales. Correct charge is the single biggest factor in compressor lifespan and efficiency.
Safely connect manifold gauge to refrigerant service ports on outdoor unit
Record high-side pressure (high side of compressor) while system is operating
Record low-side pressure (low side of compressor) while system is operating
Measure line temperatures to calculate superheat and subcooling values
Compare measured values against manufacturer specifications for your system size
If pressures are abnormal, perform nitrogen pressure test to check for leaks
If charge is off, add or remove refrigerant precisely using calibrated scales until correct
If refrigerant pressure is lower than expected, a leak is present. We perform nitrogen pressure testing (introducing harmless dry nitrogen at low pressure to identify leak locations) and UV dye tracer methods (injecting fluorescent dye that shows up under blacklight at leak locations). Once we identify a leak, we explain the repair options: sealing the leak by brazing the joint (if it’s a joint), or replacing the component if it’s a coil or line.
Small leaks found during maintenance are often repairable during that same visit. Larger leaks or component failures are explained with repair cost estimates so you can decide whether to proceed with maintenance-visit repair or schedule a dedicated repair appointment.
Use nitrogen pressure test to isolate leak location to a specific component or joint
Apply UV dye tracer and use blacklight to pinpoint leak location precisely
Determine whether leak is at a brazed joint (repairable), a fitting (repairable), or in a coil/line (requires replacement)
Provide repair estimate and timeline for the customer to authorize
For minor leaks, repair during maintenance visit if customer approves
For major leaks, schedule dedicated repair appointment with parts ordering if needed
We visually inspect all refrigerant tubing for corrosion, pinhole leaks, loose fittings, or physical damage from UV exposure or physical contact. We check that insulation around the lines is intact and not cracked or peeling—cracked insulation allows energy loss and can lead to condensation on the lines. We verify that the condensate drain line is clear and drains freely toward the catch basin or ground drain; a blocked drain line causes water accumulation that can damage walls and insulation.
We also ensure that refrigerant lines are not rubbing against sharp edges, building structure, or outdoor debris, which could cause mechanical damage over time. Any line contact issues are documented and corrected.
Inspect all visible refrigerant tubing for corrosion, dents, or pinhole leaks
Check insulation on all refrigerant lines for cracks, peeling, or separation
Test condensate drain line by pouring water and confirming it drains freely
Verify drain line slope and secure connections to prevent blockage
Confirm no refrigerant lines are rubbing against sharp edges or structural elements
Document any line routing issues that could lead to future damage
The indoor unit produces condensation as it cools air (similar to a dehumidifier). This water must drain properly or it pools and causes water damage to your home. We clean the drain pan, verify the drain line is not blocked by algae or debris, and ensure the slope allows water to flow away from the unit. We also treat the drain line with an algae inhibitor if needed to prevent biological growth that commonly blocks lines.
We inspect the condensate pump (if your system has one installed) to verify it’s functioning—we can hear the pump activate when water reaches a certain level. We test the pump’s operation and note the float switch activation point.
Clean indoor unit’s drain pan to remove algae, dirt, and debris
Verify drain line is clear and not blocked by algae, sediment, or debris
Confirm drain line slope is correct so water flows away from the unit
Test condensate pump (if present) by introducing water and confirming it engages
Treat drain line with algae inhibitor to prevent biological growth
Document drain system condition and maintenance timing for next visit
We show you the filter location and explain the cleaning schedule for your home’s air quality and usage. During heavy-use seasons (cooling in summer, heating in winter), filters should be checked monthly; during light-use periods, quarterly is adequate. A dirty filter restricts airflow, reduces efficiency, increases compressor load, and can trigger freeze-up. We replace filters during maintenance and document the replacement date.
We also review your thermostat settings: seasonal temperature setpoints, any automatic schedules programmed, and smartphone app access if your system supports remote control. We explain energy-saving adjustments (raising cooling setpoints 2-3 degrees during nighttime or work hours can save 5-10% annually) and verify that all functions are working as expected.
Locate and document filter location and access method for future replacement
Replace current filter with new one rated for your home’s air quality needs
Explain filter cleaning frequency based on seasonal usage and home conditions
Review thermostat setpoint settings and confirm comfort preferences
Test thermostat mode switching (heating, cooling, fan-only, auto)
Show smartphone app operation if your system has remote control capability
Explain energy-saving temperature setpoints and scheduling options
We run the system through complete heating and cooling cycles under load while the system is monitored. We measure airflow (CFM—cubic feet per minute) at the indoor unit vents to confirm balanced delivery. We measure compressor amps to ensure electrical load is normal. We check that all error codes have cleared and that the display shows normal operation. We listen for any unusual sounds—grinding, rattling, or hissing—that might indicate problems.
Once everything checks out, we provide you with a detailed maintenance report showing all tests performed, measurements recorded, any repairs made, filter replacement date, and recommendations for the next service. We note the date of this maintenance so you can track annual service intervals and plan future appointments. Many customers use this report for their own records and warranty documentation.
Run system in cooling mode for 10–15 minutes and verify all pressures return to normal
Run system in heating mode for 10–15 minutes and verify heating cycle works
Measure temperature differential across coils to confirm heat transfer
Clear all error codes and verify they don’t reappear after clearing
Test all modes: cool, heat, fan-only, and automatic; verify smooth transitions
Measure compressor electrical load to confirm normal operation
Listen for abnormal noises; document any concerns for future repair scheduling
Provide detailed maintenance report with test results and recommendations
Schedule next maintenance appointment (typically 6–12 months for optimal results)
We Service all of the Industries Top Equipment and Install these Trusted Brands
Make Your Comfort Upgrade Affordable with Flexible Financing Options
We believe every homeowner in Lancaster County deserves access to reliable heating and cooling — regardless of budget. That’s why J&G Heating & Air Conditioning partners with trusted financing providers to offer flexible payment plans that fit your financial situation. Whether you’re replacing an aging boiler, upgrading to a high-efficiency air conditioning system, installing a high-efficiency heat pump, or investing in a new generator system, financing allows you to enjoy the comfort you need today while spreading payments over time.
Our team will walk you through every available option during your free estimate, helping you understand monthly payment amounts, interest rates, and approval requirements. We want the financial side of your project to feel just as comfortable as the temperature in your home.
What Are the Benefits of Financing?
Keep your emergency fund intact while still investing in a high-quality HVAC system. Financing lets you upgrade your comfort without depleting your savings account, giving you financial flexibility and peace of mind.
Don’t wait for your next paycheck or tax return. With financing in place, you can replace an aging system or upgrade today — and start enjoying reliable comfort right away.
Financing puts higher-efficiency equipment within reach. Better systems mean lower energy bills, longer equipment life, and more reliable comfort — benefits that pay off year after year.
Fixed monthly payments make it easy to budget for your project. No surprises, no hidden fees — just a clear path to comfort that fits your household’s finances.
Wells Fargo
As an authorized Wells Fargo financing partner, J&G Heating & Air Conditioning offers a range of credit options to help you manage the cost of your new heating or cooling system. With competitive rates and flexible terms, qualifying homeowners can enjoy convenient monthly payments that fit comfortably into their household budget.
Through our partnership with PowerPay, we provide another trusted financing pathway for Lancaster County homeowners ready to upgrade their home comfort. PowerPay’s streamlined application process and flexible repayment plans make it easy to get started on your project without delay.
GoodLeap offers flexible financing options and competitive rates, making it easy for homeowners to invest in high-efficiency heating, cooling, and generator systems. With a simple application process and a variety of repayment terms, upgrading your home comfort doesn’t have to mean a large upfront cost.
When you join one of our maintenance programs, you’ll receive scheduled tune-ups performed by our NATE-certified technicians who know your system inside and out. We’ll clean critical components, check refrigerant levels, inspect electrical connections, test safety controls, and ensure everything is operating as it should.
Regular maintenance doesn’t just prevent breakdowns — it also helps lower your energy bills and protects your manufacturer warranty coverage. It’s one of the smartest investments you can make in your home’s comfort and your family’s safety.
Our Maintenance Plans Include:
Receive professional inspections and tune-ups for your heating and cooling systems each year, ensuring your equipment is ready before the season’s first extreme temperature day.
As a maintenance plan member, your service requests jump to the front of the line — so you spend less time waiting on a fix and more time enjoying a comfortable home.
A clean, well-tuned system uses less energy to deliver the same comfort. Members typically see lower monthly utility bills and a smaller carbon footprint year-round.
Catching small issues early prevents major breakdowns and extends the life of your HVAC equipment — protecting both your comfort and your investment.
Ideally, twice yearly: spring tune-up before cooling and fall check before heating. At minimum, once yearly in the season you use most. Annual maintenance catches problems early, extends system life, and qualifies you for full warranty coverage. Skipping maintenance increases long-term costs.
A comprehensive tune-up includes outdoor coil cleaning, refrigerant pressure testing, capacitor and electrical component testing, leak detection, condensate drain verification, filter replacement, and complete system commissioning under load. We document all findings and provide repair recommendations.
Typically 60–90 minutes for a single-zone system; longer for multi-zone systems with multiple indoor units. The visit includes inspection, cleaning, testing, and documentation. We schedule at your convenience and complete work during a single visit when possible.
No, but it prevents many common failures and catches others early when repairs are less expensive. A maintained system routinely lasts 15–20 years; an unmaintained system often fails within 5–8 years. Maintenance dramatically improves reliability odds.
We explain the problem and provide a repair estimate. You decide whether to authorize immediate repair or schedule separately. Many small repairs can be done during the maintenance visit; larger repairs requiring parts might need a separate appointment.
Yes, typically. A clean outdoor coil, correct refrigerant charge, and properly functioning controls improve efficiency by 10–15%. Many customers see those savings reflected in their utility bills within the first season after maintenance.
Absolutely. Clean or replace indoor filters monthly during heavy-use seasons and quarterly during light-use periods. Dirty filters reduce efficiency, increase system load, and can trigger freeze-up or overheating. Filter maintenance between professional visits is essential.
Schedule a maintenance visit immediately. We'll perform a comprehensive inspection and document current condition. Bringing an unmaintained system back to proper specification might require multiple visits, but extending remaining lifespan and preventing emergencies is worth the investment.
No. Regular professional maintenance is actually required to keep most warranties valid. Our documented service records prove proper maintenance, supporting any future warranty claims. Skipping maintenance might void warranty coverage for parts that fail.
Annual tune-ups are an affordable investment, with cost varying based on system complexity. This investment prevents costly emergency repairs and extends system life significantly. Many customers recover the cost in energy savings within one season.
Let’s Get Started
Keep Your Mini-Split Efficient & Reliable for Years to Come
A mini-split system is an investment in long-term comfort and efficiency. Like any equipment, it performs best when properly maintained. Regular tune-ups catch small problems before they become expensive emergencies, restore efficiency every season, and extend system life from 8–10 years to 15–20 years or more.
J&G Heating & Air Conditioning has been maintaining mini-splits across Lancaster County since 1997. Our technicians are Fujitsu and Heil certified, hold NATE certification, and understand exactly what keeps these systems running at peak performance. We document every maintenance visit so you have records proving proper care, which supports warranty claims and gives future service technicians critical history about your system.
Related Services to Protect Your Mini-Split Investment
Mini-Split Repair & Service
When problems do arise, our certified technicians diagnose and repair same-day. Emergency service is available Mon–Sun, 6:00 AM–10:00 PM (after-hours fee applies) for cooling or heating failures.